
TL;DR
Moving your rig into a closet and controlling heat and sound with smart placement is the most effective way to quiet a noisy workstation or recording space. Proper treatment, ventilation, and sealing are key to a successful ‘rig in the closet’ setup.
Ever tried to drown out a noisy GPU or server rack? You can slap on foam panels, but the real magic happens when you change where and how your machine lives. Moving a loud rig into a closet or a separate room isn’t just about hiding the noise — it’s about cutting it off at the source, with the added bonus of less echo and reflection. You can learn more about acoustic dampening, placement, and the ‘rig in the closet’ setup. If you’re using a high-powered AI workstation or recording vocals, your best bet isn’t just soundproofing.
This guide reveals the smartest ways to dampen sound, position your gear, and turn a small closet into a high-performance, quiet hub. Whether you’re grabbing a corner in your apartment or setting up a dedicated workspace, you’ll learn why distance beats foam every time and how to avoid frying your hardware in the process.
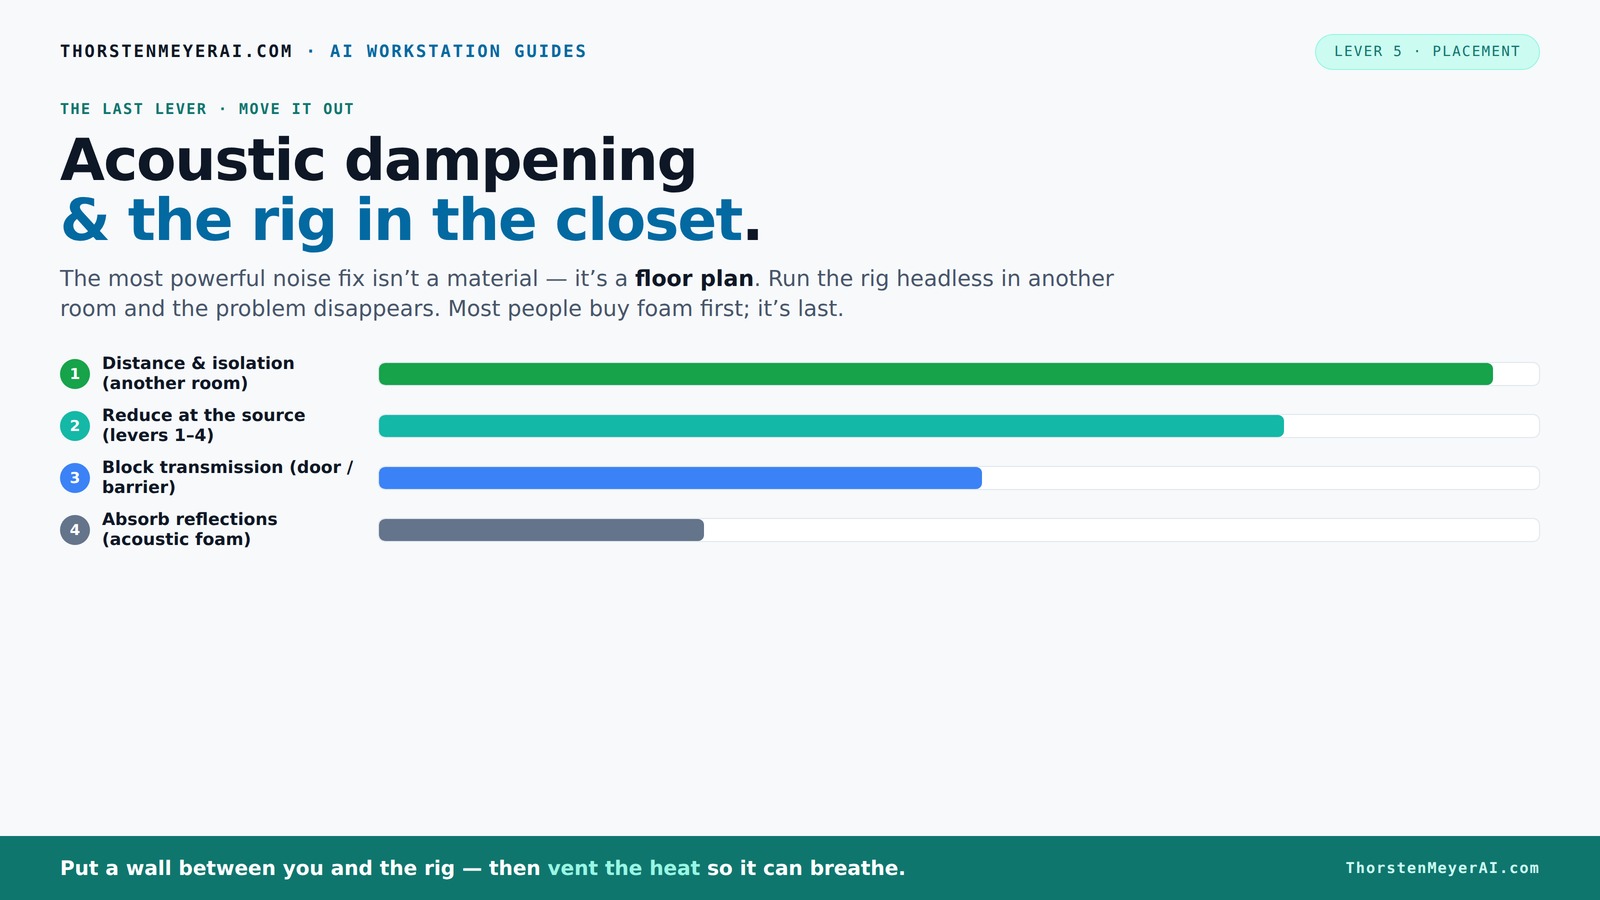
Acoustic dampening
& the rig in the closet.
The most powerful noise fix isn’t a material — it’s a floor plan. A rig you can’t hear because it’s in another room beats any amount of foam. Tap the approaches in Part 1 to see what actually works.
(another room)
(levers 1–4)
(door / barrier)
(acoustic foam)
Contain the noise, not the heat
Key Takeaways
- Moving your rig into a separate room or closet is the most effective way to eliminate noise at its source.
- Proper ventilation is critical for closet setups; without airflow, heat buildup will throttle performance and damage hardware.
- Acoustic treatment should target the most reflective surfaces around your mic, especially behind and beside it, for best sound quality.
- Sealing gaps around doors and outlets significantly improves sound isolation — don’t overlook tiny leaks.
- Bass traps and floor treatments like rugs can dramatically improve low-end clarity and reduce echo in small spaces.

TroyStudio Thickened 12 X 12 X 3 Inch Acoustic Foam Panels in Diffusion Pattern, 32 Pcs High Density Sound Absorbing Foam Diffuser, Soundproof 3D Wall Padding Tiles for Recording Studio Home Office
- Panel Size and Quantity: 12x12x3 inches, 32 panels
- Coverage Area: 32 square feet
- Material: High-density polyurethane foam
As an affiliate, we earn on qualifying purchases.
As an affiliate, we earn on qualifying purchases.
Why Distance and Isolation Are Your Best Friends for Noise Control
When it comes to quieting a loud machine, the most effective step is simply moving it away from you. Think of it like a noise barrier that’s built into your wall or room. A rig tucked into another room, basement, or closet can be silent to your ears even if it’s roaring inside.
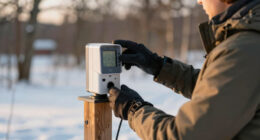
For example, I once set up a powerful GPU in a spare closet. Once it was in the next room, I could still run my AI models at full throttle, but my workspace stayed dead quiet. All the noise was contained behind the door, and I didn’t need fancy foam or soundproof panels. The key? A wired connection for latency and airflow to prevent heat buildup. For more tips on managing heat and noise, check out how to balance heat and noise in your setup.
This approach works because sound diminishes with distance, and physical separation reduces direct transmission of noise. However, the tradeoff is potential latency or inconvenience of cable runs, and the need to ensure proper airflow to prevent heat issues, which can compromise performance or damage your hardware. This strategy emphasizes the importance of balancing proximity with effective placement.
The 'Rig in the Closet' Trick — How to Do It Without Burning Out Your Hardware
Placing a high-heat, high-noise machine inside a closet works wonders — but only if you give it room to breathe. A sealed closet traps heat, causing the GPU or CPU to throttle or overheat. The fix? Ventilation. You need active airflow, like a quiet exhaust fan or venting ducting, to pull hot air out and draw in cooler air.
For instance, I installed a small, quiet exhaust fan in my closet-turned-server room. With a simple duct to the outside and a vent in the door, my rig stayed cool and quiet. You can even buy purpose-built soundproof cabinets that combine insulation and airflow control, keeping things cool without sacrificing silence. Check out how to balance heat and noise in your setup here.
The importance of this setup lies in preventing thermal throttling, which reduces performance, and avoiding hardware damage caused by excessive heat. The tradeoff involves adding noise from fans, which, if chosen carefully, can be minimized. Proper ventilation strategies ensure your hardware runs efficiently while maintaining the quiet environment you desire, highlighting the critical balance between cooling and soundproofing.
Acoustic Dampening vs. Soundproofing — What You Need to Know
| Type | What It Does | Best For |
|---|---|---|
| Acoustic Dampening | Absorbs reflections and reduces echo inside a space | Improving sound clarity, reducing reverb, controlling room echo |
| Soundproofing | Blocks sound from leaking in or out | Preventing sound escape, isolating noise between rooms |
For your closet setup, dampening materials like foam, blankets, and carpets cut down on echo and harsh reflections. Soundproofing involves sealing gaps around doors and walls to stop noise from escaping. While dampening improves the internal sound quality by reducing reverberations, soundproofing is about preventing noise from disturbing others or leaking outside. Combining both methods is crucial in small spaces, as dampening makes recordings clearer and more natural, while soundproofing ensures your noise doesn’t bother neighbors or roommates. In practice, this means treating the inside for sound quality and sealing every possible gap for isolation, understanding that each tradeoff impacts your overall noise control strategy.
Where to Place Sound Treatment for Maximum Effect
Placement is everything. The first step is to identify the reflective surfaces around your mic. For detailed guidance, see tips on acoustic treatment placement. Usually, these are the walls behind and beside it, especially if the closet has parallel surfaces. Place absorbent panels directly behind or around the mic to soak up reflections.
For example, I put a bass trap in the corner behind my mic, which cut down low-frequency muddiness. Foam panels on the side walls aimed at the mic's position reduced harsh echoes. The significance of this placement lies in targeting the primary sources of reflected sound. Improper placement can lead to residual echoes and muddiness, which compromise clarity. Properly positioned treatment minimizes unwanted reflections, resulting in cleaner recordings and more accurate sound reproduction, especially in a confined space where sound waves bounce rapidly between surfaces.
Do Bass Traps Really Help in a Small Closet? Yes, and Here’s Why
Bass traps are essential in tiny, enclosed spaces when low-frequency buildup causes boomy, muddy recordings. They absorb the deep rumble that standard foam panels can’t handle. In a small closet, parallel walls and a low ceiling create standing waves, making low-end sound less clear.
For example, I installed 4-inch thick bass traps in the corners of my closet studio. The difference? Much cleaner vocals and clearer instrument recordings, even in a tiny corner. Without bass traps, low frequencies tend to bounce and reinforce, leading to muddiness and lack of clarity. Proper placement of bass traps in corners helps break up standing waves and low-frequency resonances, resulting in a more balanced, transparent sound. Learn more about effective acoustic treatment here. You can find more about acoustic dampening and placement techniques. This is especially crucial in small spaces where low-end buildup can otherwise dominate, diminishing the overall quality of recordings.
How to Seal Gaps and Doors for Better Sound Isolation
The biggest leaks often come from gaps around doors and outlets. Sealing these can instantly improve your sound isolation. Use weatherstripping, acoustic sealant, or heavy blankets over the door to block sound escape.
For instance, I added weatherstripping around my closet door and hung moving blankets over it. The result? A noticeable reduction in noise leakage, making my recordings much quieter for neighbors or roommates. The key is to identify all potential leaks—small gaps around doorframes, electrical outlets, or ventilation openings—and seal them thoroughly. This prevents sound from leaking out and external noise from entering, which is critical in small, enclosed spaces where even tiny leaks can significantly reduce your control over the acoustic environment. Proper sealing maximizes the effectiveness of your treatment and ensures your setup remains as quiet and isolated as possible.
Floor Treatments: Do Rugs and Carpets Make a Difference?
Hard floors reflect sound and can make your closet echoey. Adding a rug or carpet absorbs these reflections and reduces overall harshness. This simple step can make your recordings warmer and less boxy.
For example, I laid down a thick rug in my closet studio. It softened the sound, especially for vocals and acoustic instruments. Additionally, carpets and rugs help dampen vibrations transmitted through the floor, which can cause low-frequency rumbles and resonance. This is especially important in small enclosed spaces where sound waves bounce rapidly, and vibrations can travel through structural elements, coloring your recordings. A well-chosen rug not only improves acoustics but also reduces mechanical vibrations, leading to cleaner sound and less unwanted noise.
Vibration & Mechanical Noise — How to Isolate From Vibrations and HVAC
Vibrations and HVAC noise often travel through the structure, making your recordings or workspaces noisy even if the room is soundproofed. Use anti-vibration pads, rubber feet, or decoupling mounts between your equipment and the floor or desk.
For instance, I set my server rack on rubber mats that absorbed vibrations. This drastically cut down the low-end rumbles transmitted through the floor, making my audio cleaner and my hardware happier. The reason this matters is that vibrations can be transmitted through building structures, causing low-frequency noise and mechanical rattles that are difficult to eliminate with traditional soundproofing. Decoupling your equipment from these vibration pathways reduces this unwanted noise, resulting in a clearer, more professional sound environment. It’s a crucial step often overlooked but essential for high-quality recordings and quiet operation in a small, enclosed space.
Frequently Asked Questions
Can I really make a closet sound good for vocals or voiceover?
Absolutely. Proper placement of sound-absorbing panels, bass traps, and sealing gaps can transform a tiny closet into a decent vocal booth. The key is treating the reflections around your mic and reducing echo, not just slapping foam on the walls.
What is the difference between acoustic treatment and soundproofing?
Acoustic treatment reduces reflections and echo inside a space, making recordings clearer. Soundproofing blocks sound from escaping or entering, preventing noise from leaking out or coming in. For a closet setup, both are important but serve different purposes.
Where should I place panels in a closet vocal booth?
Start by treating the surfaces most likely to reflect sound into your mic — behind, beside, and above it. Placing bass traps in corners and using reflection filters at the mic can also help tame low-end and harsh reflections.
Do bass traps help in a closet, or are they unnecessary?
Bass traps are essential if you notice boomy, muddled low frequencies. They absorb standing waves and low-end buildup common in small, enclosed spaces, giving you clearer recordings.
How thick should acoustic panels be for a small closet?
For small closets, 2-inch thick panels are usually enough. Larger or more problematic rooms may benefit from 4-inch panels for better low-frequency absorption.
Conclusion
The simplest secret to quiet, professional-sounding setups is to get your gear out of your immediate space. A well-ventilated closet or separate room, combined with smart placement and targeted treatment, cuts noise without breaking the bank. Remember: distance beats foam, and airflow keeps your hardware happy.
Next time you’re frustrated by noise, think about where your rig actually lives. Sometimes, the best solution is just moving it somewhere quieter — and then sealing and treating from there.